Intermediate Bullet Patterns!Since you've read Blargel's Basic tutorial, you should be familiar with all the CreateShot functions, as well as loop(){}. The latter you will likely be using often, as you can spawn a myriad of patterns by repeating a function while augmenting a value. Don't worry -- I'll show you what I mean. Note that anything after and on the same line as "//" in Danmakufu scripts is a comment, and will not be read by Danmakufu. Be sure to comment your work often so you don't forget what you're doing.
#TouhouDanmakufu
#Title[Spawning Bullets in a Circle]
#Text[Using loop to spawn bullets in a circular pattern.]
#Player[FREE]
#ScriptVersion[2]

script_enemy_main{


	let imgExRumia="script\ExRumia\img\ExRumia.png";
	let frame = 0;
	let angle = 0;


	@Initialize{
		SetLife(1500);
		SetTimer(60);
		SetInvincibility(30);
		LoadGraphic(imgExRumia); //Load the boss graphic.
		SetMovePosition02(GetCenterX, GetCenterY - 100, 120); //Move the boss to the top center of the screen.
	}

	@MainLoop{
	SetCollisionA(GetX, GetY, 32);
	SetCollisionB(GetX, GetY, 16);
	frame++;

	if(frame==120){

		loop(36){
			CreateShot01(GetX, GetY, 3, angle, BLUE12, 0);
			angle += 360/36;
		}

		angle = 0;
		frame = 60;
	}


	}

	@DrawLoop{
		//All this foolishness pertains to drawing the boss. Ignore everything in @Drawloop unless you have read and understand Nuclear Cheese's Drawing Tutorial.
		SetColor(255,255,255);
		SetRenderState(ALPHA);
		SetTexture(imgExRumia);
		SetGraphicRect(64,1,127,64);
		DrawGraphic(GetX,GetY);
	}

	@Finalize
	{
		DeleteGraphic(imgExRumia);
	}
}
Begin by creating a text file with the former code in it, and run it. The main thing you should be looking at is in @Mainloop: the if(){} statement. You'll notice we loop
CreateShot01 and
angle. What loop does is it repeats everything inside it's braces however many times you've defined it to, in the same frame. In this case, we told Danmakufu to repeat everything inside loop
36 times, which means it will spawn 36 bullets on the boss' position, at an angle of
angle, in the same frame. At the start of the script, we defined
angle as 0, so all the bullets should fire at 0 degrees, or to the right. But if you run this script, you'll see that they form a perfect circle. Why? Well, that's because we set
angle to be
angle += 360/36 everytime the loop is run, so angle will hold a different value (in this case, 10 more than it used to) everytime we create a bullet. What this does is creates a perfect circle, because every bullet created will fire at
ten degrees more than the last one, which will total to be
360 degrees because the loop is run
36 times (36x10=360).
The reason I put
angle += 360/36; instead of
angle += 10; was to show you that for any number that you
loop(num), the angle you'll want to increment by in your loop will be
angle += 360/num;. So if you want 24 bullets in your circle, the code would be:
if(frame==120){
	loop(24){
		CreateShot01(GetX, GetY, 3, angle, BLUE12, 0);
		angle+=360/24;
	}
	angle = 0;
	frame = 60;
}
We reset the value of
angle after the loop to make sure it still holds a value that we can work with later in the script, but we don't really need to do this. Sometimes purposefully dividing by a different value than what was looped can create an interesting pattern, and you might not want angle to be reset afterwards.
A simple way to change this code would be to have the angular (4th) parameter of CreateShot01 be
angle + GetAngleToPlayer, which would force one particle to always be shot towards the player.
Alright, you now know how to spawn bullets in a circle, and how to increment values in loop structures to create circular patterns. But what if you want the bullets to be spawned some distance away from the boss, but still in a circle? For that, we'll use the trigonometric functions
sin and
cos.
The
sin of an angle is the y-coordinate of a point along a circle with a radius of one.
The
cos of an angle is the x-coordinate of a point along a circle with a radius of one.
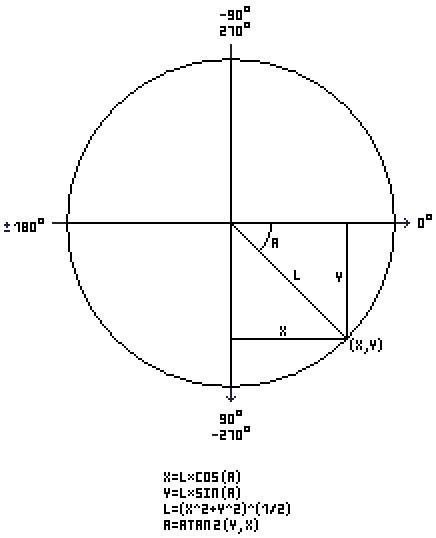
Where L = the radius of the circle, A = the angle from the origin, X = cos(A) and Y = sin(A), which form the point (cos(A), sin(A)).
Note the reversed y-coordinates, remember that Danmakufu has the positive y direction pointing
downward.
So, if we want something to spawn at the point (cos60, sin60), where the boss is the origin of the circle, we say:
CreateShot01(GetX + cos(60), GetY + sin(60), 3, 60, BLUE12, 10);
But this code won't really do anything, because we're only spawning it a distance (radius) of 1 pixel away from the boss, which we won't see. So to spawn it with a distance of say, 100 pixels away from the boss, the code would be:
CreateShot01(GetX + 100*cos(60), GetY + 100*sin(60), 60, BLUE12, 10);
Now we'll see some effects. A distance of 100 pixels away from the boss is pretty noticable. Just multiply
sin and
cos by a value, which will be your radius, to spawn particles that distance away from your origin, which in this case is the boss. So, to combine and summarize everything so far, I give you the following to place in the beginning script:
if(frame==120){
	loop(36){
		CreateShot01(GetX + 60*cos(angle), GetY + 60*sin(angle), 3, angle, BLUE12, 12);
		angle += 360/36;
	}
	angle += 4;
	frame = 112;
}
This code will continuously spawn bullets in a circle around the boss with a radius of 60 pixels. I set
angle to be
angle += 4; outside the loop to make the circle shift it's position 4 degrees everytime we spawn it, so it looks like the circle is spinning.
The format for spawning bullets in a uniform circle is:
[x, y] -> [originX + radius*cos(angle), originY + radius*sin(angle)]
Keep in mind that you don't just have to increment angle in a loop structure. You can increment any other variable, like
radius, as well. Incrementing
radius will make the circle look like it is expanding or contracting, or have other interesting effects if included inside the actual
loop{}.
Using only the trigonometric functions, as well as our knowledge of loop structures and incrementing values, we can make some pretty nice patterns. Here's an example script using everything we've learned so far. Can you tell what's happening?
#TouhouDanmakufu
#Title[Border of Wave and Tutorial]
#Text[How to use incrementing values and loop structures to create complex danmaku.]
#Player[FREE]
#ScriptVersion[2]

script_enemy_main{


	let imgExRumia="script\ExRumia\img\ExRumia.png";
	let frame = 0;
	let frame2 = 0;
	let angle = 0;
	let angleAcc = 0;
	let radius = 0;


	@Initialize{
		SetLife(4000);
		SetTimer(60);
		SetInvincibility(30);
		LoadGraphic(imgExRumia);
		SetMovePosition02(GetCenterX, GetCenterY - 120, 120);
	}

	@MainLoop{
	SetCollisionA(GetX, GetY, 32);
	SetCollisionB(GetX, GetY, 16);
	frame++;
	frame2++;

	if(frame==120){

		loop(6){
			CreateShot01(GetX + radius*cos(angle), GetY + radius*sin(angle), 3, angle, BLUE12, 12);
			angle += 360/6;
		}
		angle += angleAcc;
		angleAcc += 0.1;
		frame = 119;
	}

	if(frame2>=-140 && frame2 <=110){
		radius++;
	}
	if(frame2>=111 && frame2 <= 360){
		radius--;
	}
	if(frame2==360){
		frame2=-141;
	}

	}

	@DrawLoop{
		SetColor(255,255,255);
		SetRenderState(ALPHA);
		SetTexture(imgExRumia);
		SetGraphicRect(64,1,127,64);
		DrawGraphic(GetX,GetY);
	}

	@Finalize
	{
		DeleteGraphic(imgExRumia);
	}
}
In this code, we have bullets spawn at six points around a uniform circle with a radius
radius, which is being controlled by a second frame counter
frame2. If
frame2 is between -140 and 110, then the radius will increase, if it is between 111 and 360, the radius will decrease. The angle these bullets is being fired off at is always being increased by
angleAcc, which is also increasing, so the circle will spin at an increasingly faster rate. Combining the oscillation of
radius and the ever increasing rate of
angle creates a pretty complex pattern, don'tcha think? Feel free to experiment by changing values, like changing
angleAcc+=0.2 or
radius+=0.5.